Xceedas

Xceedas
xceedas

Tuesday, 4 November 2014

The Fibonacci Numbers

Introduction
I'm sure every one of you have attempted to generate Fibonacci numbers once in a while during college labs or during an interview. Most of us just learn the procedure to generate the sequence in C, C++ or C# and thought that the deal is done. Have you ever thought of why we generate this sequence? What is the significance of this sequence? This blog helps you to explore the various possibilities of Fibonacci numbers and also provides the simple logic to generate the sequence.

Fibonacci Numbers
Definition
The Fibonacci Numbers is a sequence of numbers in the following order: 0, 1, 1, 2, 3, 5, 8, 13, 21, 34... The next number is found by adding up the two numbers before it. The formula for calculating these numbers is:

F(n) = F(n-1) + F(n-2)

where:
F(n) is the term number.,F(n-1) is the previous term (n-1). ,F(n-2) is the term before that (n-2). 
By definition, the first two numbers in the Fibonacci Sequence are either 0 and 1, or 1 and 1, depending on the chosen starting point of the sequence and each subsequent number is the sum of the previous two numbers.

History
The Fibonacci numbers or Fibonacci sequence is a series of numbers named after a famous mathematician Leonardo Pisano (popularly known as Fibonacci), although he did not discover this sequence but used it as an example in his book Liber Abaci, which means "The Book of Calculations". The Fibonacci series was originally known in Indian Mathematics hundreds of years before he used it in his book.

Fibonacci Numbers in Real life Scenarios

The Fibonacci Numbers play a significant role in real life scenarios. Many of the numbers in the Fibonacci sequence can be related to the things that we see around us. These numbers are well represented in Honeybees. Honeybees, usually, lives in a colony called a Hive and they have a very unusual Family Tree. In a colony of honeybees, they are divided into three categories: 
  1. Queen: One special female bee in the colony is called the Queen and is the only female that produces eggs.
  2. Workers: The remaining female bees are workers in the colony and produce no eggs.
  3. Drones: The male bees do not work and are called Drone Bees.
Male bees are produced by the queen's unfertilized eggs, so they only have a mother but no father. All the female bees are produced when the queen has mated with a male bee and so have both the parents, mother as well as father. Most of the female bees cannot produce eggs and become worker bees but some of the lucky ones grow into queens and go off to start a new colony. So, female bees have two parents, a male and a female whereas male bees have just one parent, a female.

If we follow the family tree of Honeybees, it represents the Fibonacci sequence perfectly. A male bee has 1 parent, a female. He has 2 grandparents, a male and a female since his mother had two parents. He has 3 great-grandparents: his grandmother has two parents but his grandfather had only one."
Number of
Parents
Grand Parents
Great Grand-Parents
Gt Gt Grand-Parents
Gt Gt Gt Grand-Parents
Male Bee12358
Female Bee
2
35813

Fibonacci numbers also appear in plants and flowers. Many plants show the Fibonacci numbers in the arrangement of their leaves around the stem. Leaves are arranged in such a way that each leaf is exposed to a significant amount of sunlight and is not suppressed by the top leaves of the plant.
Here is the link of a TED Talk about Fibonacci Numbers:
Fibonacci Series in C#
The Fibonacci numbers are a fascinating sequence of numbers. We can generate the sequence in various ways. Let's use some special cases to generate the Fibonacci sequence.

Case 1 (Iterative Approach): This approach is the simplest and quickest way to generate the sequence of Fibonacci Numbers.
  1. using System;   
  2. namespace FibonacciSeries  
  3. {  
  4.     class Program  
  5.     {  
  6.         static int FibonacciSeries(int n)  
  7.         {  
  8.             int firstnumber = 0, secondnumber = 1, result = 0;  
  9.    
  10.             if (n == 0) return 0; //To return the first Fibonacci number   
  11.             if (n == 1) return 1; //To return the second Fibonacci number   
  12.    
  13.    
  14.             for (int i = 2; i <= n; i++)  
  15.             {  
  16.                 result = firstnumber + secondnumber;  
  17.                 firstnumber = secondnumber;  
  18.                 secondnumber = result;  
  19.             }  
  20.    
  21.             return result;  
  22.         }  
  23.    
  24.         static void Main(string[] args)  
  25.         {  
  26.             Console.Write("Enter the length of the Fibonacci Series: ");  
  27.             int length = Convert.ToInt32(Console.ReadLine());  
  28.    
  29.             for (int i = 0; i < length; i++)  
  30.             {  
  31.                 Console.Write("{0} ", FibonacciSeries(i));  
  32.             }  
  33.             Console.ReadKey();  
  34.         }  
  35.     }  
  36. }  
Case 2 (Recursive Approach): In this approach, we use recursion to process the sequence of numbers. We need to pass the length of the Fibonacci Series to the recursive method and then it iterates continuously until it reaches the goal.
  1. using System;  
  2. namespace FibonacciSeries  
  3. {  
  4.       class Program  
  5.       {  
  6.             public static int FibonacciSeries(int n)  
  7.             {  
  8.                   if (n == 0) return 0; //To return the first Fibonacci number   
  9.                   if (n == 1) return 1; //To return the second Fibonacci number   
  10.                   return FibonacciSeries(n - 1) + FibonacciSeries(n - 2);  
  11.             }  
  12.             public static void Main(string[] args)  
  13.             {  
  14.                   Console.Write("Enter the length of the Fibonacci Series: ");  
  15.                   int length = Convert.ToInt32(Console.ReadLine());  
  16.                   for (int i = 0; i < length; i++)  
  17.                   {  
  18.                         Console.Write("{0} ", FibonacciSeries(i));  
  19.                   }  
  20.                   Console.ReadKey();  
  21.             }  
  22.       }  
  23. }  
There is another way to use the recursive method:
  1. using System;  
  2. namespace FibonacciSeries  
  3. {  
  4.     class Program  
  5.     {  
  6.         public static void FibonacciRecursive  
  7.        (  
  8.         int firstnumber,  
  9.         int secondnumber,  
  10.         int counter,  
  11.         int length  
  12.        )  
  13.         {  
  14.             if (counter <= length)  
  15.             {  
  16.                 Console.Write("{0} ", firstnumber);  
  17.                 FibonacciRecursive(secondnumber, firstnumber + secondnumber, counter + 1, length);  
  18.             }  
  19.         }  
  20.    
  21.         public static void Main(string[] args)  
  22.         {  
  23.             Console.Write("Enter the length of the Fibonacci Series: ");  
  24.             int length = Convert.ToInt32(Console.ReadLine());  
  25.             FibonacciRecursive(0, 1, 1, length);  
  26.             Console.ReadKey();  
  27.         }  
  28.     }  
  29. }   
Case 3 (nth Fibonacci Number): We can also find the nth number of the Fibonacci sequence using Recursion. One point must be note down that the user input is decrement by 1 because we are starting the series with 0.
  1. using System;  
  2. namespace FibonacciSeries  
  3. {  
  4.     class Program  
  5.     {  
  6.         public static int NthFibonacciNumber(int n)  
  7.         {  
  8.             if ((n == 0) || (n == 1))  
  9.             {  
  10.                 return n;  
  11.             }  
  12.             else  
  13.             {  
  14.                 return (NthFibonacciNumber(n - 1) + NthFibonacciNumber(n - 2));  
  15.             }  
  16.         }  
  17.    
  18.         public static void Main(string[] args)  
  19.         {  
  20.             Console.Write("Enter the nth number of the Fibonacci Series: ");  
  21.             int number = Convert.ToInt32(Console.ReadLine());  
  22.             number = number - 1;         
  23.             //We have to decrement the length because the series starts with 0  
  24.    
  25.             Console.Write(NthFibonacciNumber(number));  
  26.             Console.ReadKey();  
  27.         }  
  28.     }  
  29. }  
Conclusion
In this article, I've explained the significance of Fibonacci Numbers and also provides several routinies to determine the series. I hope this article helps you to understand Fibonacci Numbers. Your feedback and constructive criticism is always appreciated, keep it coming. Until then, try to put a ding in the Universe

Using Generic Algorithms to Layout Circuit Boards

CircuitBoard.jpg
Figure 1 - Parts layout of a typical circuit board
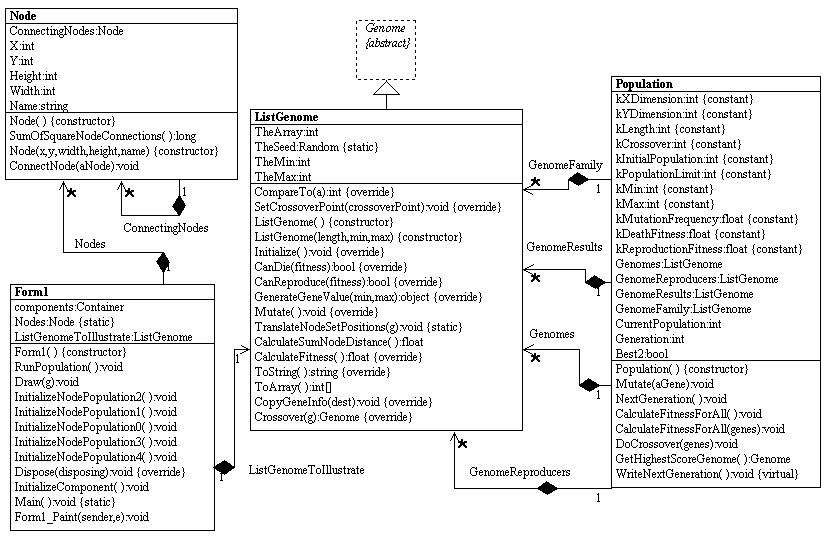
The UML design for this particular Algorithm is shown below in a WithClass 2000 UML diagram
GACircuitBoardUMLsmall.gif
(Click for bigger image)
Figure 2 - WithClass UML Diagram of Layout Algorithm (Reverse engineered with WithClass 2000)
The classes implementing the Genetic Algorithm consist of the Population, Genome, andListGenome classes.  The Node class represents an electronic component on the board. The Node has position and size attributes to indicate its position on the circuit board and it has a ConnectingNode collection that holds all of the components to which it is wired.   The Genomes of this algorithm consist of a list of integers representing a N x N grid of relative positions.  The first integer represents the upper-left hand corner and the last integer represents the lower right hand corner.  Each integer can be any number representing the node at a particular position.  For example:
The Genome   1 4 3 5 9 2 7 8 6 11 14 10 12 16 15 13  would look like the following in an N x N grid:
GANodeRepresentation.gif
Figure 3 - Genome Representation in 2 dimensions
We use the method TranslateNodeSetPositions to handle this transformation from array to component grid.  The method TranslateNodeSetPositions in the ListGenome class translates the Genome array of integers into a set of nodes relatively position in a 2d grid as shown in figure 3.  Once we have a node 2d spacial representation of our Genome, we can now use this in our fitness function to determine the distance between connected nodes for every node.  By summing all of the connection distances between nodes, we can come up with a single  number representing the fitness of our particular gene.
The TranslateNodeSetPositions method of the ListGenome is shown below:
Listing 1 - Translating the Genome String of Numbers into a 2d Grid of Nodes Placed on the Grid
public static void TranslateNodeSetPositions(ListGenome g)
{
// first we need to translate the Gene array into node positionsint currentX = 0;int currentY = 0;int maxHeight = 0; // go through each item in the array and set the node collection in the form// to the relative position represented by the Genome Arrayfor (int i = 0; i < Population.kXDimension ; i++)
{
for (int j = 0; j < Population.kYDimension ; j++)
{
// set the particular node specified by the Genome Item to the relative position on the 2D gridNode currentNode = ((Node)Form1.Nodes[(int)g.TheArray[i*Population.kYDimension + j]]);
currentNode.X = currentX;
currentNode.Y = currentY;
currentX += currentNode.Width + 10; 
// now advance to next X positionif (currentNode.Height > maxHeight)
maxHeight = currentNode.Height;
}
// advance the Y PositioncurrentY += maxHeight + 10;
currentX = 0;
maxHeight = 0; 
// reset max height}
}
Now that we have the Node Positions set, we can calculate the fitness based on the distances to connected nodes.  This is accomplished using the CalculateSumNodeDistance method of the ListGenome class.  This method also weights the Sum if duplicate nodes are found in the Genome to discourage duplicate nodes.  Note that a larger sum is a poorer fitness:
Listing 2 - Calculate the Sum of the Distances between connected nodes to produce a fitness
public float CalculateSumNodeDistance()
{
TranslateNodeSetPositions(
this);// Now we can calculate sum of the distanceslong sum = 0;foreach (Node n in Form1.Nodes)
{
sum += n.SumOfSquareNodeConnections();
} 
// check for unique nodesint[] histogram = new int[Population.kLength];foreach (int val in TheArray)
{
histogram[val]++;
}
foreach (int val in histogram)
{
// in any non unique number weight the sum heavilyif (val > 1)
sum += sum*val*val;
}
// compute the fitness of the Genome by inverting the sum (add a small value so we never get the 0 divisor error)return 1/((float)sum + .0001f);
}
That's all there is to the Genetic Algorithm.  All we have to do now is set up a sample node set with connections to various nodes.  Our first node set is a simple set of 16 nodes that connect one to another:
Listing 3 - Set up an initial set of nodes with uninitialized positions and connect them together
protected void InitializeNodePopulation0()
{
// create 16 nodes and add them to the node collectionNode node1 = new Node(0, 10, 50, 60, "1");
Nodes.Add(node1);
Node node2 = 
new Node(0, 10, 50, 60, "2");
Nodes.Add(node2);
Node node3 = 
new Node(0, 10, 50, 60, "3");
Nodes.Add(node3);
Node node4 = 
new Node(0, 10, 50, 60, "4");
Nodes.Add(node4);
Node node5 = 
new Node(0, 10, 50, 60, "5");
Nodes.Add(node5);
Node node6 = 
new Node(0, 10, 50, 60, "6");
Nodes.Add(node6);
Node node7 = 
new Node(0, 10, 50, 60, "7");
Nodes.Add(node7);
Node node8 = 
new Node(0, 10, 50, 60, "8");
Nodes.Add(node8);
Node node9 = 
new Node(0, 10, 50, 60, "9");
Nodes.Add(node9);
Node node10 = 
new Node(0, 10, 50, 60, "10");
Nodes.Add(node10);
Node node11 = 
new Node(0, 10, 50, 60, "11");
Nodes.Add(node11);
Node node12 = 
new Node(0, 10, 50, 60, "12");
Nodes.Add(node12);
Node node13 = 
new Node(0, 10, 50, 60, "13");
Nodes.Add(node13);
Node node14 = 
new Node(0, 10, 50, 60, "14");
Nodes.Add(node14);
Node node15 = 
new Node(0, 10, 50, 60, "15");
Nodes.Add(node15);
Node node16 = 
new Node(0, 10, 50, 60, "16");
Nodes.Add(node16); 
// connect the nodes one after another 1-->2-->3-->4--->5-->6-->etc.node1.ConnectNode(node2);
node2.ConnectNode(node3);
node3.ConnectNode(node4);
node4.ConnectNode(node5);
node5.ConnectNode(node6);
node6.ConnectNode(node7);
node7.ConnectNode(node8);
node8.ConnectNode(node9);
node9.ConnectNode(node10);
node10.ConnectNode(node11);
node11.ConnectNode(node12);
node12.ConnectNode(node13);
node13.ConnectNode(node14);
node14.ConnectNode(node15);
node15.ConnectNode(node16);
}
When we run the genetic algorithm and display the best gene after 3000 generations we get the following output to the Form shown in Figure 4.  As you can see, the healthiest Genomes produced a Node layout with the shortest distance between connected nodes.
GACircuitBoard0.jpg
Figure 5 - Node Layout after 3000 generations
Although we had a nice result here, generations don't always produce a perfect result after convergence, but its still pretty good as shown in Figure 5:
Best Genome after 3000 Generations
13 12 11 16 1 14 15 10 2 5 6 9 3 4 7 8 -->1.260784E-05
GACircuitBoard00.jpg
Figure 6 - Another Node Layout produced on the same Node Set
To further illustrate the power  of GA in laying out nodes, we came out with a few other initial node scenarios.  The next scenario connects all nodes to a central node (Node 8).  Although this layout is fairly obvious, it is still pretty cool to see the computer come up with the answer.  Here is the initial Node Connections in Code:

Listing 4 - Connecting all nodes to a central node
node1.ConnectNode(node8);
node2.ConnectNode(node8);
node3.ConnectNode(node8);
node4.ConnectNode(node8);
node5.ConnectNode(node8);
node6.ConnectNode(node8);
node7.ConnectNode(node8);
node9.ConnectNode(node8);
After running for 3000 generations, we produce the star configuration we would expect from a central node as shown in Figure 7
Best Genome after 3000 Generations
2 7 1 10 4 8 3 12 9 5 6 15 16 14 13 11 -->1.960784E-05
GACircuitBoard3.jpg
Figure 7 - Node configuration for central node placement
For the last experiment, we connected two of the nodes (node #1 and node #16)  each to 4 other nodes as shown in listing 5:
Listing 5 - Two centralized nodes each connected to 4 other nodes
node1.ConnectNode(node2);
node1.ConnectNode(node3);
node1.ConnectNode(node4);
node1.ConnectNode(node5); 
node16.ConnectNode(node12);
node16.ConnectNode(node13);
node16.ConnectNode(node14);
node16.ConnectNode(node15);
This run of 3000 generations produces two spider connections centered around the two nodes in question (1 and 16) as shown in Figure 8.
Best Genome after 3000 Generations
9 6 5 8 11 4 1 3 15 16 12 2 13 14 10 7 -->2.427185E-05
GACircuitBoard4.jpg
Figure 8 - two central nodes each with 4 connections
Conclusion

Genetic Algorithms are very powerful tools for helping solve optimization problems. Laying out PC boards is certainly one practical example of how to use Genetic Algorithms to solve what is normally a very difficult problem to solve in your head.  I suspect the user can  improve upon the fitness function a bit by measuring the shortest distance between node corners instead of the connections between the center of the nodes. You can also play with different node widths and node heights and try the algorithm to see if it can handle the different component sizes such as for a large IC or a small resistor.  The code in this project can also be expanded to handle nodes in 3 dimensions. The sky is the limit, it just depends on what your imagination lays out for you in .NET.

Microsoft announces RemoteIE

Microsoft announces RemoteIE to test web pages in IE on Windows, Mac OS X, iOS and Android.
 
The service available via Azure RemoteApp allows you run latest version of Internet Explorer without installing the latest OS or virtual machine. Web developers can use this service to test their web applications without the hassle to run Windows 10 operating system.


Use this service by login with Microsoft account at https://remote.modern.ie. Register and download the Azure RemoteApp client for your platform.
 
The service comes with some conditions: 
  1. No earlier version of IE is available through Remote App as it requires Windows Server 2012 or newer. Although developers can use the F12 Developer tools to change the compatibility modes to test web applications in previous versions.
  2. Sessions idle for more than 10 minutes will be automatically logged out and no session is allowed for more than 1 hour. Developers need to start a new sessions after 1 hour.
  3. Service will not be smooth as compared to Internet Explorer running locally.
  4. RemoteIE will not be able to navigate to local sites or domains behind a firewall.
  5. Internet Explorer will be the only application available through Azure RemoteApp.
To know more, visit RemoteIE's FAQ.