
Xceedas

xceedas
Tuesday, 30 December 2014
Group by With LinQ
Here is Simple Code for understanding Group By in LinQ.
// Group by With Linq
List ls = new List();
using (LinqModel.LinqEntities ST1 = new LinqModel.LinqEntities())
{
var V = (from State in ST1.State_Master
group State by State.CountryID into temp
select new
{
T1 = temp.Key.Value,
T2 = temp
}).ToList();
foreach (var c in V)
{
for (int i = 0; i < c.T2.ToList().Count; i++)
{
ls.Add(c.T2.ToList()[i].StateName);
}
}
};
// Group by With Linq using Lambada expression
// Same Result as above
using (LinqModel.LinqEntities ST1 = new LinqModel.LinqEntities())
{
var vLambada = ST.State_Master.GroupBy(state => state.CountryID).ToList();
foreach (var state in vLambada)
{
for (int i = 0; i < state.Count(); i++)
{
ls.Add(state.ToList()[i].StateName);
}
}
};
Rpt.DataSource = ls;
Rpt.DataBind();
[Current Affairs] Microsoft U.S. MVP Open Day Announced
 Microsoft MVP Award announced that the first ever U.S. MVP Open Day will be held at the Microsoft Office in Malvern, PA in March 2015.
The U.S. MVP Open Day is an event where MVP connect, learn and share with the Microsoft product team and stakeholders. This event is for U.S. MVPs only.
The dates of the events are March 27-28, 2015. The detailed agenda will be announced in February.
Microsoft MVP Award announced that the first ever U.S. MVP Open Day will be held at the Microsoft Office in Malvern, PA in March 2015.
The U.S. MVP Open Day is an event where MVP connect, learn and share with the Microsoft product team and stakeholders. This event is for U.S. MVPs only.
The dates of the events are March 27-28, 2015. The detailed agenda will be announced in February.
Monday, 22 December 2014
[ASP.NET Programming] How to Create Web API in ASP.Net MVC
This article explains what the Web API is and its basics.
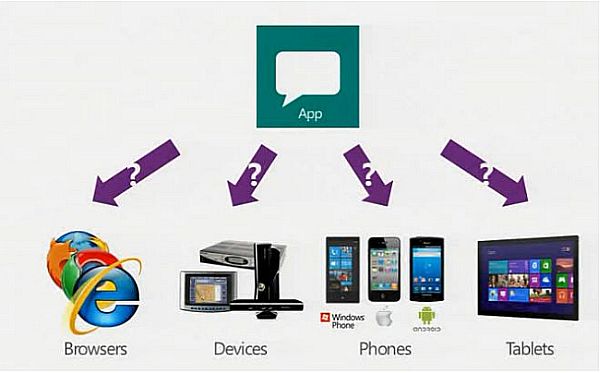
The preceding image is from: http://forums.asp.net/t/1903769.aspx?When+to+use+web+api
Let's start with a definition first.
Web API
The ASP.NET Web API is a framework that makes it easy to build HTTP services that reach a broad range of clients, including browsers and mobile devices.
The ASP.NET Web API is an ideal platform for building Restful applications on the .NET Framework. Referred from “Microsoft.com”.
Why to use the Web API
Currently most mobile devices, browsers and tablets are the medium for accessing most of the internet and in this also people are using mobile apps the most and to provide data to apps we are now going to use the Microsoft new technology called Web API.
When to use it
If you want to expose the data/information of your application to your clients and other people then that other people can use your data and interact with the data/information you expose to them.
For example, a mobile application requires a service.
HTML 5 requires a service.
Desktop PC and tablets require services.
Currently most device apps require Web API services.
The ASP.Net Framework leverages both web standards such as HTTP, JSON and XML and it provides a simple way to build and expose REST based data services.
Some core concepts of ASP.Net MVC are similar to the ASP.Net Web API such as routing and controllers.
Requirements
We are using Visual Studio 2012 for a demo application.
Building a Web API
Let's start with creating a Web API project.
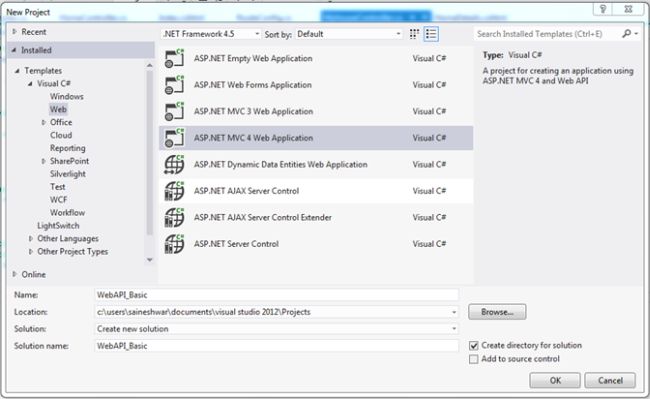
Start Visual Studio and select New project from the Start page or from the File menu select "File" -> "New" -> "Project...".
In the template pane select Installed Templates and expand the Visual C# menu. Inside that Visual C# select Web. In the list of projects select ASP.Net MVC 4 Web Application.
And name the project WebAPI_Basic.
For reference see the following snapshot.
After adding, a new dialog will pop-up.
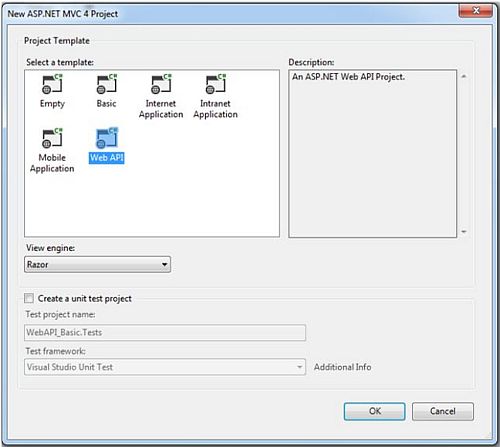
Inside the project template select Web API and in the view engine select Razor.
A new project is created now.
Let's begin with adding Web API Controller
Now let's begin with adding a Web API Controller. It is nearly similar to adding a Controller in ASP.NET MVC.
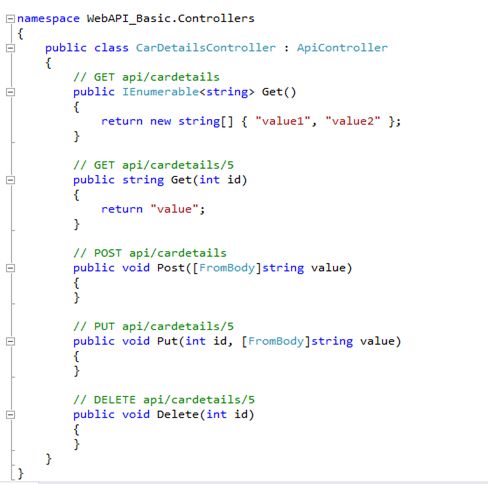
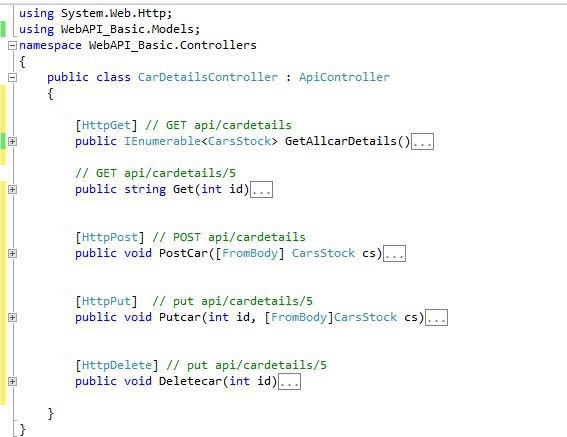
Right-click on the Controller folder and add a new Web API Controller with the name CarDetailsController and in the template select API Controller with an empty read / write action.
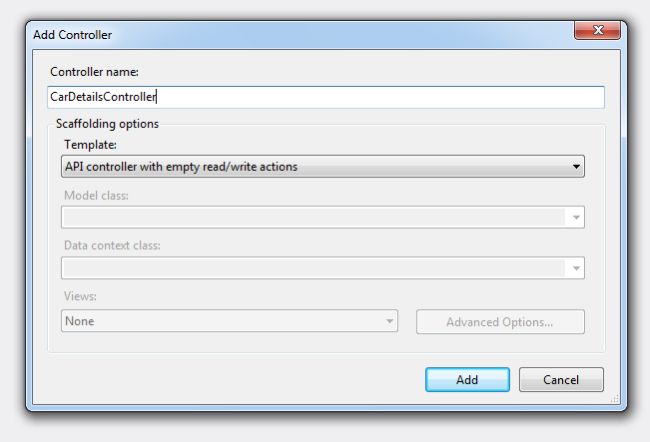
After adding the Controller you will see the code as in the following snapshot.
You can keep this Web API controller anywhere in the application.
If you want to follow the convention then create the new folder in the root your of application with the name API.
Inside that you can add a Web API controller.
You have successfully added a Web API controller to your application.
Now you can run the application and test it.
For testing I am passing http://localhost:32359/api/cardetails/1 for calling the method get.
Wow, it's working!

It's easy to configure it as a Web API.
The ASP.Net MVC and ASP.Net Web API makes heavy use of convention for configuration to lighten the work load for creating the services.
For example, add a decorating method with attributes to make it easy to do CRUD operations.
Else it will make it difficult to understand and code.
The HTTP actions and their corresponding CRUD operations are:
1.GET (Read)
2.Retrieves the representation of the resource.
3.PUT(Update)
4.Update an existing resource.
5.POST (Create)
6.Create new resource.
7.DELETE (Delete)
8.Delete an existing resource.
Now let's begin with how to create a CRUD operation with the WEB API.
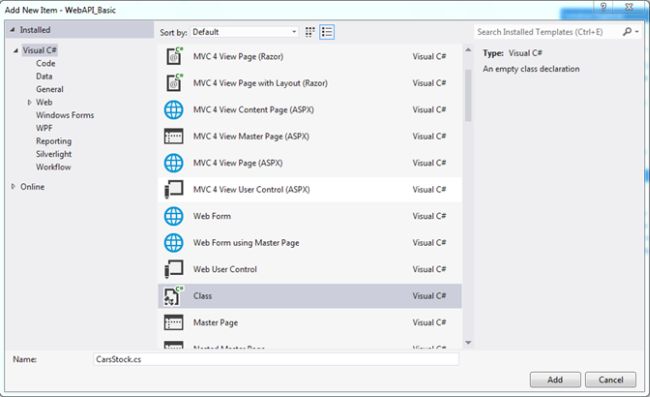
Let's start by adding a Model.
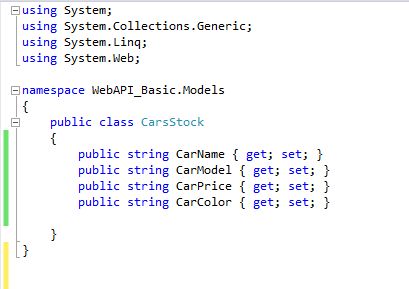
To add the model right-click on the model folder and add a class with the name CarsStock.
After adding the Model CarsStock.cs now let's start with adding properties to the class.
After adding the model properties now I will consume the HTTP service developed using the ASP.NET Web API in a simple cshtml page with jQuery and Ajax.
For that in the View folder I will add a folder named Car and inside that folder will add a CarStock named view. To add it just right-click on the View folder and select View.
The following snapshot shows how I had added the view.

After adding the view you will get a blank view because we are not using any tightly coupled model here.
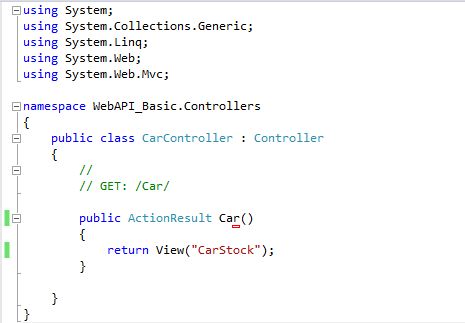
Then add a Controller with the name CarController. Call this view Carstock for the demo of consuming the Web API.
In this I called the view CarStock.
After adding the Controller and View now let us move back towards the Web API and make some changes that we have already created with the name “CarDetailsController”.
Let's get to the first method in CarDetailsController.
Here is a snapshot of all the methods and models after adding the attributes to it.
Now let's move to the view and do CRUD operations from there.
For getting a list of data I have created a function in jQuery.
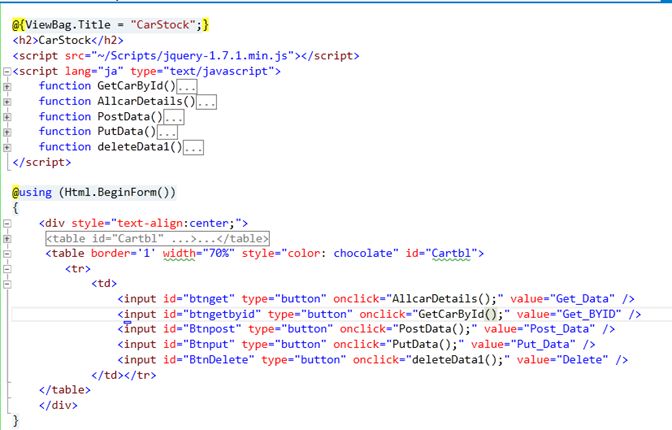
In the carstock view I have just added 5 buttons and on the click event of every button a different function of the Web API is called.
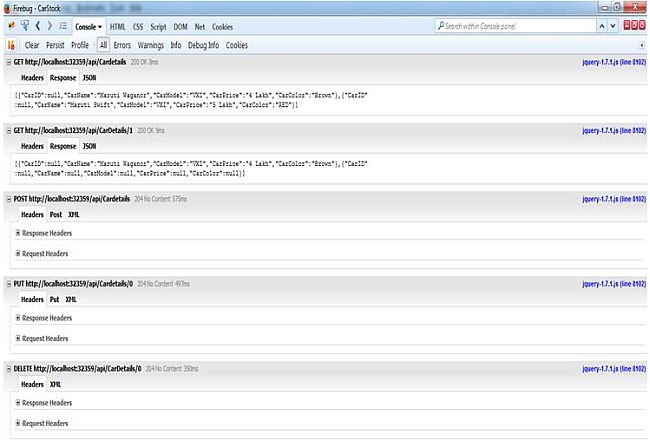
The following snippet is debugged in Firebug.
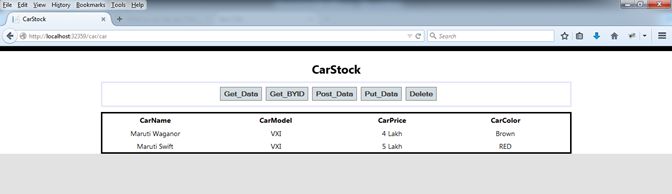
Final Output
Here in this view I have consumed a Web API for Demo.
I know that now all my web developer friends must have a basic understanding of what the Web API
The preceding image is from: http://forums.asp.net/t/1903769.aspx?When+to+use+web+api
Let's start with a definition first.
Web API
The ASP.NET Web API is a framework that makes it easy to build HTTP services that reach a broad range of clients, including browsers and mobile devices.
The ASP.NET Web API is an ideal platform for building Restful applications on the .NET Framework. Referred from “Microsoft.com”.
Why to use the Web API
Currently most mobile devices, browsers and tablets are the medium for accessing most of the internet and in this also people are using mobile apps the most and to provide data to apps we are now going to use the Microsoft new technology called Web API.
When to use it
If you want to expose the data/information of your application to your clients and other people then that other people can use your data and interact with the data/information you expose to them.
For example, a mobile application requires a service.
HTML 5 requires a service.
Desktop PC and tablets require services.
Currently most device apps require Web API services.
The ASP.Net Framework leverages both web standards such as HTTP, JSON and XML and it provides a simple way to build and expose REST based data services.
Some core concepts of ASP.Net MVC are similar to the ASP.Net Web API such as routing and controllers.
Requirements
We are using Visual Studio 2012 for a demo application.
Building a Web API
Let's start with creating a Web API project.
Start Visual Studio and select New project from the Start page or from the File menu select "File" -> "New" -> "Project...".
In the template pane select Installed Templates and expand the Visual C# menu. Inside that Visual C# select Web. In the list of projects select ASP.Net MVC 4 Web Application.
And name the project WebAPI_Basic.
For reference see the following snapshot.
After adding, a new dialog will pop-up.
Inside the project template select Web API and in the view engine select Razor.
A new project is created now.
Let's begin with adding Web API Controller
Now let's begin with adding a Web API Controller. It is nearly similar to adding a Controller in ASP.NET MVC.
Right-click on the Controller folder and add a new Web API Controller with the name CarDetailsController and in the template select API Controller with an empty read / write action.
After adding the Controller you will see the code as in the following snapshot.
You can keep this Web API controller anywhere in the application.
If you want to follow the convention then create the new folder in the root your of application with the name API.
Inside that you can add a Web API controller.
You have successfully added a Web API controller to your application.
Now you can run the application and test it.
For testing I am passing http://localhost:32359/api/cardetails/1 for calling the method get.
Wow, it's working!
It's easy to configure it as a Web API.
The ASP.Net MVC and ASP.Net Web API makes heavy use of convention for configuration to lighten the work load for creating the services.
For example, add a decorating method with attributes to make it easy to do CRUD operations.
Else it will make it difficult to understand and code.
- [HttpPut]
- public void Put(int id, [FromBody]string value)
- {
- }
- [HttpPost]
- public void Post([FromBody]string value)
- {
- }
- [HttpDelete]
- public void Delete(int id)
- {
1.GET (Read)
2.Retrieves the representation of the resource.
3.PUT(Update)
4.Update an existing resource.
5.POST (Create)
6.Create new resource.
7.DELETE (Delete)
8.Delete an existing resource.
Now let's begin with how to create a CRUD operation with the WEB API.
Let's start by adding a Model.
To add the model right-click on the model folder and add a class with the name CarsStock.
After adding the Model CarsStock.cs now let's start with adding properties to the class.
After adding the model properties now I will consume the HTTP service developed using the ASP.NET Web API in a simple cshtml page with jQuery and Ajax.
For that in the View folder I will add a folder named Car and inside that folder will add a CarStock named view. To add it just right-click on the View folder and select View.
The following snapshot shows how I had added the view.
After adding the view you will get a blank view because we are not using any tightly coupled model here.
Then add a Controller with the name CarController. Call this view Carstock for the demo of consuming the Web API.
In this I called the view CarStock.
After adding the Controller and View now let us move back towards the Web API and make some changes that we have already created with the name “CarDetailsController”.
Let's get to the first method in CarDetailsController.
- GET IEnumerable
This method is used to get a list of data.- [HttpGet]
- public IEnumerable<CarsStock> GetAllcarDetails()
- {
- CarsStock ST = new CarsStock();
- CarsStock ST1 = new CarsStock();
- List<CarsStock> li = new List<CarsStock>();
- ST.CarName = "Maruti Waganor";
- ST.CarPrice = "4 Lakh";
- ST.CarModel = "VXI";
- ST.CarColor = "Brown";
- ST1.CarName = "Maruti Swift";
- ST1.CarPrice = "5 Lakh";
- ST1.CarModel = "VXI";
- ST1.CarColor = "RED";
- li.Add(ST);
- li.Add(ST1);
- return li;
- }
In this method I have used the Model CarsStock and created a list of CarsStock “List<CarsStock>“.
And returning it.
- GET by id In this GET method you can retrieve records for the database by passing an id.
- public IEnumerable<CarsStock> Get(int id)
- {
- CarsStock ST = new CarsStock();
- CarsStock ST1 = new CarsStock();
- List<CarsStock> li = new List<CarsStock>();
- if (id == 1)
- {
- ST.CarName = "Maruti Waganor";
- ST.CarPrice = "4 Lakh";
- ST.CarModel = "VXI";
- ST.CarColor = "Brown";
- li.Add(ST);
- }
- else
- {
- ST1.CarName = "Maruti Swift";
- ST1.CarPrice = "5 Lakh";
- ST1.CarModel = "VXI";
- ST1.CarColor = "RED";
- li.Add(ST1);
- }
- return li;
- }
- POST
In this POST method you can post data (CREATE) to the database. In this I am using the Carstock model to post the data.- [HttpPost]
- public void PostCar([FromBody] CarsStock cs)
- {
- }
- PUT
In this PUT method you can UPDATE the data (UPDATE) to the database. I am using the Carstock model to update the data.- [HttpPut]
- public void Putcar(int id, [FromBody]CarsStock cs)
- {
- }
- DELETE
- [HttpDelete]
- public void Deletecar(int id)
- {
- }
Here is a snapshot of all the methods and models after adding the attributes to it.
Now let's move to the view and do CRUD operations from there.
For getting a list of data I have created a function in jQuery.
- Calling GET IEnumerable List from Ajax and getting data from the Web API.
- <script lang="ja" type="text/javascript">
- function AllcarDetails() {
- $.ajax({
- type: "GET",
- url: "http://localhost:32359/api/Cardetails", //URI
- dataType: "json",
- success: function (data) {
- debugger;
- var datadatavalue = data;
- var myJsonObject = datavalue;
- contentType: "application/json";
- $.each(myJsonObject, function (i, mobj) {
- $("#Cartbl").append('<tr><td width="50px">' + mobj.CarName +
- '</td><td width="50px">' + mobj.CarModel +
- '</td><td width="50px">' + mobj.CarPrice +
- '</td>' + '</td><td width="50px">'
- + mobj.CarColor + '</td></tr>');
- });
- },
- error: function (xhr) {
- alert(xhr.responseText);
- }
- });
- }
- Calling PostCar Method using Ajax and posting data to the Web API.
- function PostData()
- {
- var cardetails =
- {
- CarName: "Ertiga",
- CarModel: "LXI",
- CarPrice: "5000000",
- CarColor: "blue"
- };
- $.ajax({
- type: "POST",
- data: JSON.stringify(cardetails),
- url: "http://localhost:32359/api/Cardetails",
- dataType: "json",
- contentType: "application/json",
- });
- }
- Calling the PUTcar method using Ajax and updating the data of the Web API.
- function PutData() {
- var cardetails =
- {
- CarName: "Ertiga",
- CarModel: "LXI",
- CarPrice: "5000000",
- CarColor: "blue"
- };
- var t = JSON.stringify(cardetails);
- var id = "0";
- $.ajax({
- url: 'http://localhost:32359/api/Cardetails/' + id,
- type: "put",
- contentType: "application/json; charset=utf-8",
- data: t,
- dataType: "json",
- });
- }
- Calling the Delete car method using Ajax and to delete data of the Web API.
- function deleteData1()
- {
- var id = 0;
- $.ajax({
- url: 'http://localhost:32359/api/CarDetails/' + id,
- type: 'DELETE',
- success: function (data) {
- },
- error: function (data) {
- alert('Problem in deleting car:' + data.responseText);
- }
- });
- }
- Calling GET by ID from Ajax and getting data from the Web API by id.
- function GetCarById() {
- var id = 1;
- $.ajax({
- url: 'http://localhost:32359/api/CarDetails/' + id,
- type: 'GET',
- dataType: "json",
- success: function (data) {
- var datavalue = data;
- var myJsonObject = datavalue;
- var CarModel = myJsonObject[0].CarModel;
- var CarName = myJsonObject[0].CarName;
- var CarColor = myJsonObject[0].CarColor;
- var CarPrice = myJsonObject[0].CarPrice;
- $('<tr><td>' + CarModel + '</td><td>' + CarName +
- '</td><td>' + CarColor + '</td>' + '</td><td>' + CarPrice + '</td></tr>').appendTo('#Cartbl');
- },
- error: function (xhr) {
- alert(xhr.responseText);
- }
- });
- }
In the carstock view I have just added 5 buttons and on the click event of every button a different function of the Web API is called.
The following snippet is debugged in Firebug.
Final Output
Here in this view I have consumed a Web API for Demo.
I know that now all my web developer friends must have a basic understanding of what the Web API
How to Fetch Google Analytics Statistics and Display it in Your C# Application
Google Analytic is a website statistics service offered by the
internet giant Google. With the basic service being free of charge, it is
definitely the most popular tool that the vast majority of webmasters rely on.
It helps to gather wide range of statistics about the visitors, social networks,
search engines or even PPC (pay-per-click) networks and advertising.
All these statistics are comfortably accessible through the web interface, so the webmasters can easily keep an eye on them. But what if you just need to display the statistics in your own website or desktop application? In this case, the Google Analytic API (currently in version V3) comes into place that allows fetching any kind of statistics you can think of.
Please note that discussing the whole API would be out of the scope of this article. I am going to focus solely on fetching some data (statistics) and displaying it in a form of a chart in a Windows Forms application.
Google Analytic Reporting API
The reporting API is a simple yet powerful API (application programming interface) that allows the developers to retrieve the gathered data from Google Analytic. In order to retrieve the statistics, some have to be gathered first. Therefore, there is one important prerequisite in order to use the API. You have to have a Google account and a website with the tracking code. I assume you already know how to generate the JavaScript tracking code and insert it into your website.
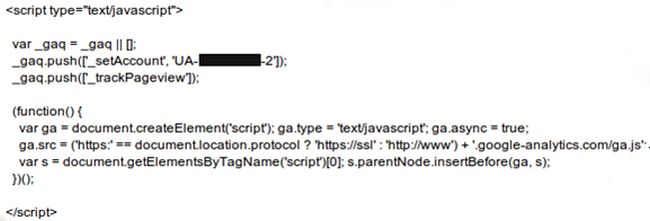
Image 1: Google Analytic tracking code
Enabling the API Access
There are two different options how to fetch the data. The first option is the Simple API access that doesn’t allow accessing any private user data, so it is not sufficient for our purpose. The second approach is the Authorized API access (OAuth 2.0) that allows us to access private user data, so we are going to stick with it.
In order to rely on OAuth 2.0, our application must be authenticated and the user must grant access to it. To do so, several steps have to be taken.
First, we have to log on to the Google Developers Console with our Google account and create a new project.
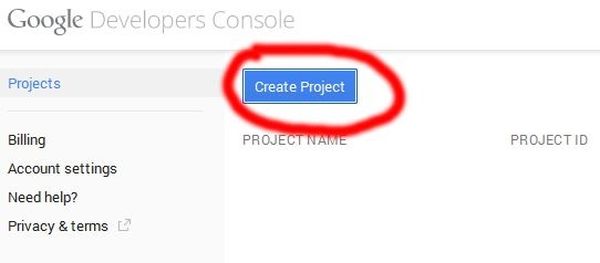
Image 2: Creating Google Developers' project
We are going to name the project “Csharpacess” and leave the auto-generated Project ID as it is.
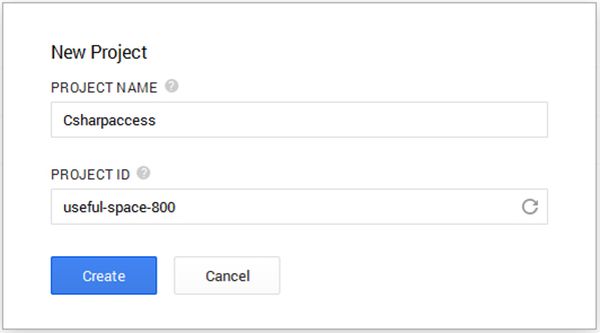
Image 3: Creating new project
Once the project is created, we are being redirected to its dashboard. Now, we need to enable the analytics API and create a new access credentials.
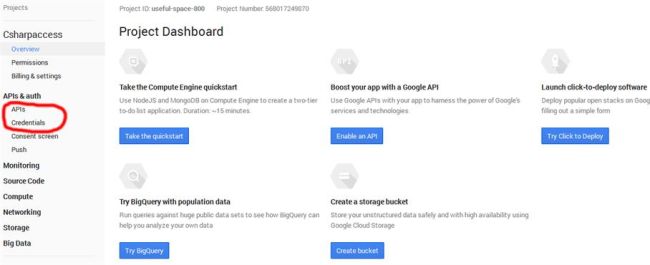
Image 4: Newly created project's dashboard
After clicking on “APIs” in the left menu bar, we are being taken to the APIs list. Now we scroll down to find the Analytics API and turn it on by clicking on the “OFF” button.
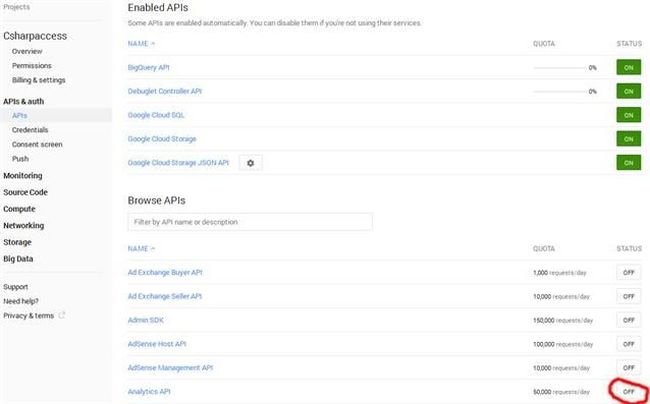
Image 5: Enabling the Analytic API
Once turned on, we are going to create new credentials by clicking the “Credentials” in the menu on the left. As mentioned above, we need to rely on OAuth if we want to access private user’s data, so we are going to create new ID by clicking on the “Create new Client ID” button.
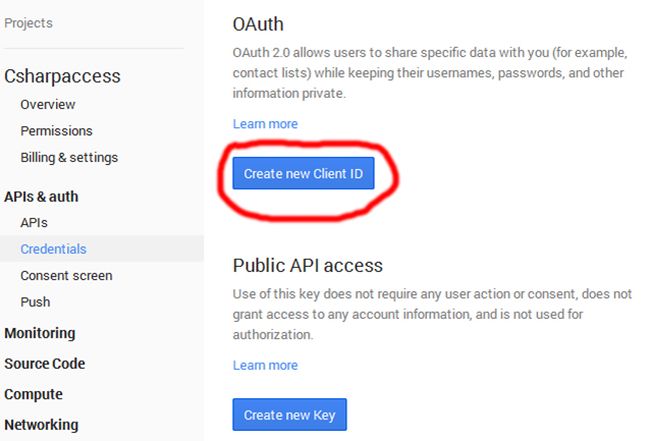
Image 6: Creating new access credentials
Now, we need to choose between three types of Client ID. Because we are going to use it in our desktop application, we are going to choose the “Service account” option.
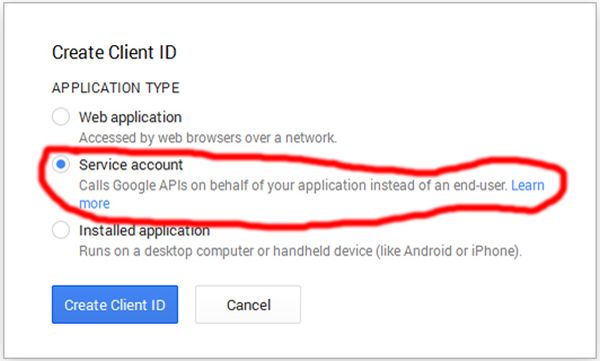
Image 7: Creating the Service Account client ID
Once created, the browser will prompt us to save the private key to our computer. We will need the certificate for authentication, so we are going to save it to our computer for later use. Also, we are going to rename it to “Csharpaccess.p12” for easier use. Please pay attention to the auto-generated private key’s password – “notasecret”. We are going to need it in our C# application, so I encourage you to write it down or save to some temporary file.
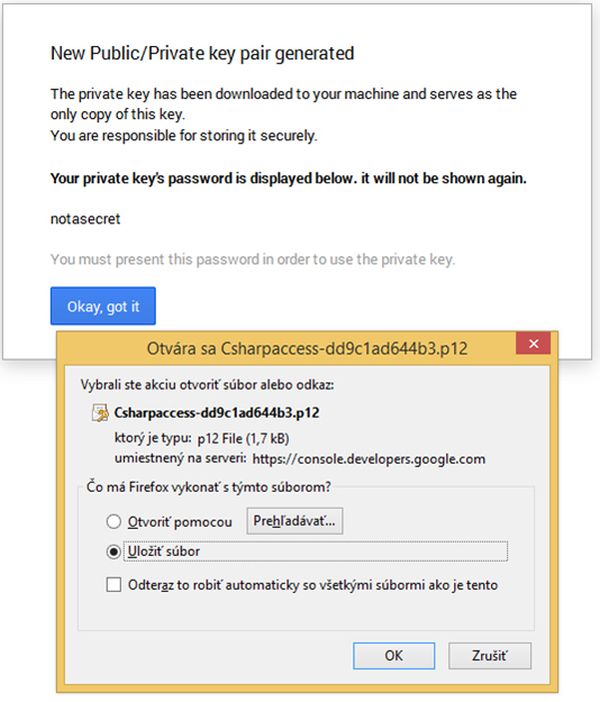
Image 8: Downloading the certificate
After the download, we are being redirected back to the dashboard with the added Service account credentials. These are now accessible anytime we need to through the Google Developers Console. However, we are going to need these credentials later, so we are going to copy them to some temporary text file for faster access.

Image 9: Created Service Account credentials
From now, we have a successfully created an OAuth 2.0 access. Next step is to pair it with our website through Google Analytic.
Pairing with Google Analytic
The Reporting API credentials we have just created can be used to access as many websites as we need to. All we need to do is add a new user for the desired website(s) through the Google Analytics’ User Management. As an email address, we have to use the email address that was generated for the OAuth 2.0 authentication in the previous step.
Therefore, we are going to put “568017249870-9pqlki56dvp3bn64hb2pnvlnais8ndes@developer.gserviceaccount.com” in the email textbox while leaving the default Read & Analyze permission as that is all we need in this case.
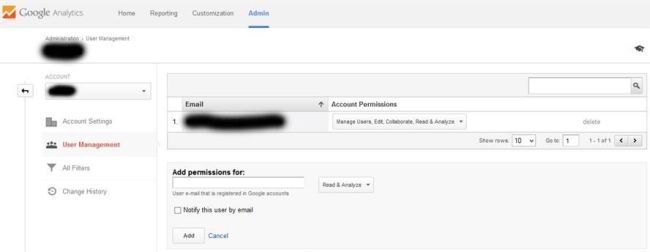
Image 10: Adding new Google Analytic user
From now, everything is set up, so we can start Visual Studio and create our desktop application.
Creating Simple WinForms Application
I assume you already have some C# basics, so I will not talk about creating the form or the buttons. Instead, I am going to focus solely on retrieving and displaying the gathered data through the OAuth 2.0 authentication we have just created.
Note: We have to make sure, that our Visual Studio project is set to target the .NET Framework 4.0 or .NET Framework 4.5.
Adding necessary references
We start with adding some required libraries’ references. To install Google.Apis.Analytics.v3 Client Library, we use the popular NuGet Package Manager Console (Tools -> NuGet Package Manager). Open the console and use the following command to install the library: Install-Package Google.Apis.Analytic.v3

Image 11: Installing Google.Apis.Analytics.v3 library with NuGet Console
After the installation process is over, we can open the project’s references to verify that additional libraries were added.
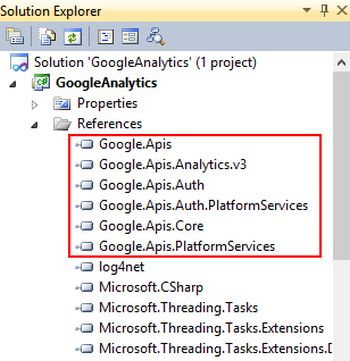
Image 12: New references successfully added
Initializing and authenticating the service
We start with declaring some variables we are going to need.
Authenticating the service
For authenticating purposes, we create a private method called Authenticate.
First, we start with creating the X509Certificate2 object. In order to work with this type of object, we have to import corresponding namespace with the ‘using’ directive. The object’s constructor takes three arguments – the physical file path of the certificate, the password to access it and a storage flags that handles the private key import. We have already declared the first two arguments in the previous step and for the third one, we are going to choose Exportable from the X509KeyStorageFlags enumeration.
Don’t forget: the first parameter is the physical path and name of the certificate, so do not forget to copy the downloaded certificate to the debug folder of the project.
Next, we define the access scopes for the service in a form of string array. There are several scopes to choose from, but the AnalyticsReadonly is the only one we care about. However, for the purpose of this tutorial we are going to add the other ones as well.
Now,
we are going to create a new ServiceAccountCredential for the
certificate. After adding the Google.Apis.Auth.OAuth2 namespace with
the ‘using’ directive, we use already declared variables to create and
initialize the object.
Finally, we create the service itself and authenticate to it. Note that we need to add Google.Apis.Services namespace first.
Querying data
For querying the Analytics data, we use the service’s Get method that populates the GetRequest object. This method takes four parameters – the website code with the ‘ga:’ prefix, start date, end date and the metrics. The first three speak for themselves. When it comes to metrics, this is basically the type of data we want to query.
For further reference I advise you to visit the Dimensions & Metrics Reference guide where you can learn about all kinds of metrics and common data queries. For our purposes, I am going to use the ‘sessions’ metric because it represents the visits we are interested in. For the date range, we are going the use the last 15 days and we have to cast it to a proper string format.
We also need to add some statistical dimensions; otherwise only aggregate values for the requested date range will be return. Because we want to query the number of daily visits and display it in a chart, we add year, month and day dimensions. Finally, we execute the request to get the data.
Populating the visits list
For easier data manipulation and chart databinding, we have created a dummy ChartRecord class and declared a list of records in the class’ scope.
Now, we can easily iterate the requested data and fill the ChartRecord list.
Visually displaying the data
To visually display the requested analytics data, we are going to use the out-of-the-box WinForms chart control and databind the list to it.
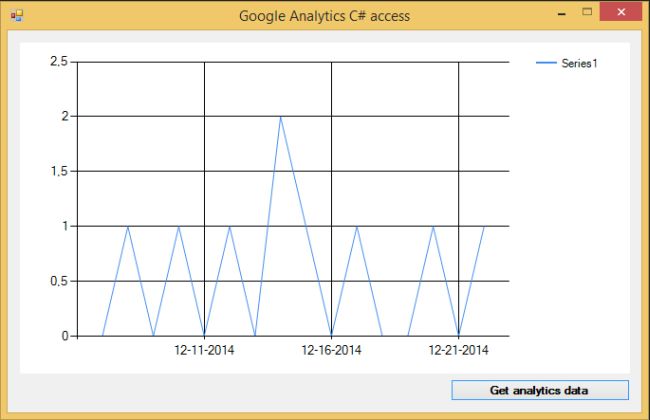
Image 14: fetched statistics in a form of chart
Putting it altogether
There is a demo application attached for the download. I left all the accesses enabled, so you can experiment with the API and all the metrics/dimensions available.
Conclusion
Even though the Google Analytics’s web interface is sufficient for most of webmasters, they are specific occasions when you need to display the data locally in your own application. In this case, we use the Reporting API that offers wide range of functionality and its usage is straightforward and well documented.
All these statistics are comfortably accessible through the web interface, so the webmasters can easily keep an eye on them. But what if you just need to display the statistics in your own website or desktop application? In this case, the Google Analytic API (currently in version V3) comes into place that allows fetching any kind of statistics you can think of.
Please note that discussing the whole API would be out of the scope of this article. I am going to focus solely on fetching some data (statistics) and displaying it in a form of a chart in a Windows Forms application.
Google Analytic Reporting API
The reporting API is a simple yet powerful API (application programming interface) that allows the developers to retrieve the gathered data from Google Analytic. In order to retrieve the statistics, some have to be gathered first. Therefore, there is one important prerequisite in order to use the API. You have to have a Google account and a website with the tracking code. I assume you already know how to generate the JavaScript tracking code and insert it into your website.
Image 1: Google Analytic tracking code
Enabling the API Access
There are two different options how to fetch the data. The first option is the Simple API access that doesn’t allow accessing any private user data, so it is not sufficient for our purpose. The second approach is the Authorized API access (OAuth 2.0) that allows us to access private user data, so we are going to stick with it.
In order to rely on OAuth 2.0, our application must be authenticated and the user must grant access to it. To do so, several steps have to be taken.
First, we have to log on to the Google Developers Console with our Google account and create a new project.
Image 2: Creating Google Developers' project
We are going to name the project “Csharpacess” and leave the auto-generated Project ID as it is.
Image 3: Creating new project
Once the project is created, we are being redirected to its dashboard. Now, we need to enable the analytics API and create a new access credentials.
Image 4: Newly created project's dashboard
After clicking on “APIs” in the left menu bar, we are being taken to the APIs list. Now we scroll down to find the Analytics API and turn it on by clicking on the “OFF” button.
Image 5: Enabling the Analytic API
Once turned on, we are going to create new credentials by clicking the “Credentials” in the menu on the left. As mentioned above, we need to rely on OAuth if we want to access private user’s data, so we are going to create new ID by clicking on the “Create new Client ID” button.
Image 6: Creating new access credentials
Now, we need to choose between three types of Client ID. Because we are going to use it in our desktop application, we are going to choose the “Service account” option.
Image 7: Creating the Service Account client ID
Once created, the browser will prompt us to save the private key to our computer. We will need the certificate for authentication, so we are going to save it to our computer for later use. Also, we are going to rename it to “Csharpaccess.p12” for easier use. Please pay attention to the auto-generated private key’s password – “notasecret”. We are going to need it in our C# application, so I encourage you to write it down or save to some temporary file.
Image 8: Downloading the certificate
After the download, we are being redirected back to the dashboard with the added Service account credentials. These are now accessible anytime we need to through the Google Developers Console. However, we are going to need these credentials later, so we are going to copy them to some temporary text file for faster access.
Image 9: Created Service Account credentials
From now, we have a successfully created an OAuth 2.0 access. Next step is to pair it with our website through Google Analytic.
Pairing with Google Analytic
The Reporting API credentials we have just created can be used to access as many websites as we need to. All we need to do is add a new user for the desired website(s) through the Google Analytics’ User Management. As an email address, we have to use the email address that was generated for the OAuth 2.0 authentication in the previous step.
Therefore, we are going to put “568017249870-9pqlki56dvp3bn64hb2pnvlnais8ndes@developer.gserviceaccount.com” in the email textbox while leaving the default Read & Analyze permission as that is all we need in this case.
Image 10: Adding new Google Analytic user
From now, everything is set up, so we can start Visual Studio and create our desktop application.
Creating Simple WinForms Application
I assume you already have some C# basics, so I will not talk about creating the form or the buttons. Instead, I am going to focus solely on retrieving and displaying the gathered data through the OAuth 2.0 authentication we have just created.
Note: We have to make sure, that our Visual Studio project is set to target the .NET Framework 4.0 or .NET Framework 4.5.
Adding necessary references
We start with adding some required libraries’ references. To install Google.Apis.Analytics.v3 Client Library, we use the popular NuGet Package Manager Console (Tools -> NuGet Package Manager). Open the console and use the following command to install the library: Install-Package Google.Apis.Analytic.v3
Image 11: Installing Google.Apis.Analytics.v3 library with NuGet Console
After the installation process is over, we can open the project’s references to verify that additional libraries were added.
Image 12: New references successfully added
Initializing and authenticating the service
We start with declaring some variables we are going to need.
- private string keyFilePath = @"Csharpaccess.p12";
- private string serviceAccountEmail = "568017249870-9pqlki56dvp3bn64hb2pnvlnais8ndes@developer.gserviceaccount.com";
- private string keyPassword = "notasecret";
- private string websiteCode = "86391935";
- private AnalyticsService service = null;
For authenticating purposes, we create a private method called Authenticate.
First, we start with creating the X509Certificate2 object. In order to work with this type of object, we have to import corresponding namespace with the ‘using’ directive. The object’s constructor takes three arguments – the physical file path of the certificate, the password to access it and a storage flags that handles the private key import. We have already declared the first two arguments in the previous step and for the third one, we are going to choose Exportable from the X509KeyStorageFlags enumeration.
Don’t forget: the first parameter is the physical path and name of the certificate, so do not forget to copy the downloaded certificate to the debug folder of the project.
- using System.Security.Cryptography.X509Certificates;
- //loading the Key file
- var certificate = new X509Certificate2(keyFilePath, keyPassword, X509KeyStorageFlags.Exportable);
- var scopes =
- new string[] {
- AnalyticsService.Scope.Analytics, // view and manage your analytics data
- AnalyticsService.Scope.AnalyticsEdit, // edit management actives
- AnalyticsService.Scope.AnalyticsManageUsers, // manage users
- AnalyticsService.Scope.AnalyticsReadonly}; // View analytics data
- using Google.Apis.Auth.OAuth2;
- var credential = new ServiceAccountCredential(new ServiceAccountCredential.Initializer(serviceAccountEmail)
- {
- Scopes = scopes
- }.FromCertificate(certificate));
- using Google.Apis.Services;
- service = new AnalyticsService(new BaseClientService.Initializer()
- {
- HttpClientInitializer = credential
- });
For querying the Analytics data, we use the service’s Get method that populates the GetRequest object. This method takes four parameters – the website code with the ‘ga:’ prefix, start date, end date and the metrics. The first three speak for themselves. When it comes to metrics, this is basically the type of data we want to query.
For further reference I advise you to visit the Dimensions & Metrics Reference guide where you can learn about all kinds of metrics and common data queries. For our purposes, I am going to use the ‘sessions’ metric because it represents the visits we are interested in. For the date range, we are going the use the last 15 days and we have to cast it to a proper string format.
We also need to add some statistical dimensions; otherwise only aggregate values for the requested date range will be return. Because we want to query the number of daily visits and display it in a chart, we add year, month and day dimensions. Finally, we execute the request to get the data.
- DataResource.GaResource.GetRequest request = service.Data.Ga.Get(
- "ga:" + websiteCode,
- DateTime.Today.AddDays(-15).ToString("yyyy-MM-dd"),
- DateTime.Today.ToString("yyyy-MM-dd"),
- "ga:sessions");
- request.Dimensions = "ga:year,ga:month,ga:day";
- var data = request.Execute();
For easier data manipulation and chart databinding, we have created a dummy ChartRecord class and declared a list of records in the class’ scope.
- private List<ChartRecord> visitsData = new List<ChartRecord>();
- class ChartRecord
- {
- public ChartRecord(string date, int visits)
- {
- _date = date;
- _visits = visits;
- }
- private string _date;
- public string Date
- {
- get { return _date; }
- set { _date = value; }
- }
- private int _visits;
- public int Visits
- {
- get { return _visits; }
- set { _visits = value; }
- }
- }
- foreach (var row in data.Rows)
- {
- visitsData.Add(new ChartRecord(new DateTime(int.Parse(row[0]), int.Parse(row[1]), int.Parse(row[2])).ToString("MM-dd-yyyy"), int.Parse(row[3])));
- }
To visually display the requested analytics data, we are going to use the out-of-the-box WinForms chart control and databind the list to it.
- analyticsChart.Series[0].XValueMember = "Date";
- analyticsChart.Series[0].YValueMembers = "Visits";
- analyticsChart.DataSource = visitsData;
- analyticsChart.DataBind();
Image 14: fetched statistics in a form of chart
Putting it altogether
There is a demo application attached for the download. I left all the accesses enabled, so you can experiment with the API and all the metrics/dimensions available.
Conclusion
Even though the Google Analytics’s web interface is sufficient for most of webmasters, they are specific occasions when you need to display the data locally in your own application. In this case, we use the Reporting API that offers wide range of functionality and its usage is straightforward and well documented.
Wednesday, 17 December 2014
Microsoft Adds Language Translator to Skype
Microsoft’s Skype just added the
language translation feature. Now people from two different languages
can communicate via Skype. Skype uses the real-time translation in the
messaging service.
In an announcement, the Skype corporate vice president, Gurdeep Singh Pall said, "Today, we are excited to announce the first phase of the Skype Translator preview program,".
This program had its first trail with the school children in Mexico City and their counterparts at a school in Tacoma, Washington. One classroom of children speaking in Spanish and the other speaking in English.

According to Skype Translator, there are 40 languages are available as of now. You can get the benefit of Skype Translation using Windows 8.1 on the desktop or device. The service will also be available for Windows 10 Technical Preview users. Microsoft announced in May what it called a breakthrough in real-time voice translation.
Skype Essentials: How to use Skype Translator
https://www.youtube.com/watch?feature=player_embedded&v=YvUk4EBV2FI
In an announcement, the Skype corporate vice president, Gurdeep Singh Pall said, "Today, we are excited to announce the first phase of the Skype Translator preview program,".
This program had its first trail with the school children in Mexico City and their counterparts at a school in Tacoma, Washington. One classroom of children speaking in Spanish and the other speaking in English.
According to Skype Translator, there are 40 languages are available as of now. You can get the benefit of Skype Translation using Windows 8.1 on the desktop or device. The service will also be available for Windows 10 Technical Preview users. Microsoft announced in May what it called a breakthrough in real-time voice translation.
Skype Essentials: How to use Skype Translator
https://www.youtube.com/watch?feature=player_embedded&v=YvUk4EBV2FI
Scientists dream up a credit card that no one can forge

Put very simply, instead of a magnetic strip, future credit cards would have a band of nanoparticles running down one side. When a bank wanted to assign the card to a person, a laser would fire at it, bouncing light randomly across the strip. The quantum pattern that would be left by the "indentations" would be sufficiently random that, like a fingerprint, it'd be too resource-intensive to replicate, if it was at all possible. Unlike other high-faultin' anti-fraud ideas, the team claims that this quantum secure authentication works in the real world and is, apparently, easy to implement with current tech. Now be glad we didn't try to work in any sort of puns about taking solace in quantum physics for the James Bond fans amongst you.Credit to http://www.engadget.com/2014/12/16/quantum-credit-cards/
Tuesday, 16 December 2014
[SQL] Get the Values from the Any Combination of a Record from Table
This tutorial about how to get the values from the any combination of a record from table.
1.SQL have the wonderful feature LIKE.
2.LIKE is keyword for following of WHERE condition.
3.LIKE supports %,_ operators.
Lets we look demo,
Like with %
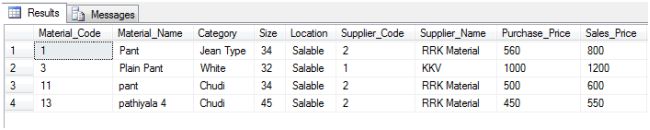
The following query gives the output which are the material_name starts with p. '%' operator supports multi character. so p% means all the values starts with p.
- select * from table where material_name like 'p%'
Like with _
The following query gives the output for which are the material name starts with 'p' and following 2 characters and end with 't'
- select * from table where material_name like 'p__t'(Note: here 2 underscores)

Another example with % and _
We already discussed with % represents multi character pattern and _ represents one character, use this functionality we can play some thing.
The following query gives, starts with 'p' and multi characters and one space and 3 characters and finally ends with 't'
select * from table where material_name like 'p% ___t'

I hope this tutorial is useful.
[SQL] Insert Data into Database using Simple Stored Procedure in SQL
Database Structure
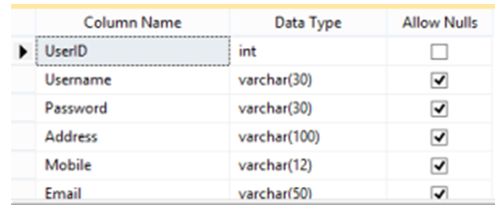
Simple stored procedure for insert.
- create procedure insert_userdetail
- (
- @Username varchar(50),
- @Password varchar(50),
- @Address varchar(120),
- @Mobile varchar(12),
- @Email varchar(50)
- )
- as
- insert into tbl_ins values(@Username,@Password,@Address,@Mobile,@Email)
Userdetails.aspx.cs
Code:
- protected void btnins_Click(object sender, EventArgs e)
- {
- SqlConnection con = new SqlConnection(System.Configuration.ConfigurationManager.ConnectionStrings[“userconnstring”].ConnectionString);
- SqlCommand cmd = new SqlCommand(“insert_userdetail”, con);
- cmd.CommandType = CommandType.StoredProcedure;
- con.Open();
- cmd.Parameters.AddWithValue(“@Username”, txtusername.Text);
- cmd.Parameters.AddWithValue(“@Password”, txtpassword.Text);
- cmd.Parameters.AddWithValue(“@Address”, txtaddress.Text);
- cmd.Parameters.AddWithValue(“@Mobile”, txtmob.Text);
- cmd.Parameters.AddWithValue(“@Email”, txtemail.Text);
- cmd.ExecuteNonQuery();
- alert.Text = “User Inserted Successfully!”;
- con.Close();
- }
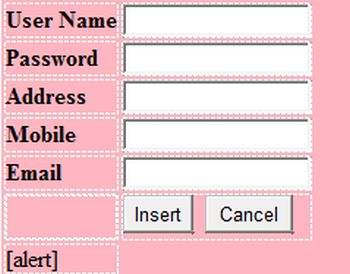
Screen 1

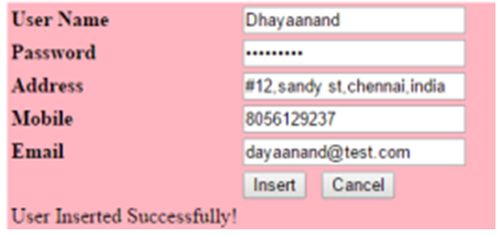
Screen 2:[Database
Tuesday, 9 December 2014
Skype Status Display For a User in MVC
Scenario
The administrator in a site wants to view the list of users with his/her Skype status and also wants to chat/call by clicking on the Skype status in the user profile.
Prerequisites
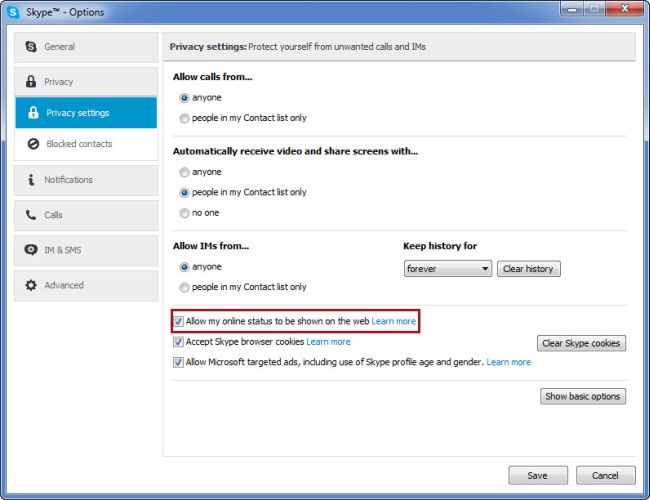
To display the Skype status in a public site, the Skype user must check (select) the privacy setting "Allow my online status to be shown on the Web". You can go to the settings by navigating from the Skype menu Privacy settings and check the "Allow my online status to be shown on the Web" as shown in the following screenshot.
Implementation
Step 1
Create a new project named "UsersSkypeStatusInMVC" and choose the template "MVC". It then creates an MVC template project.
Step 2
Add a Controller named "AdminController" with the following procedure.
The administrator in a site wants to view the list of users with his/her Skype status and also wants to chat/call by clicking on the Skype status in the user profile.
Prerequisites
To display the Skype status in a public site, the Skype user must check (select) the privacy setting "Allow my online status to be shown on the Web". You can go to the settings by navigating from the Skype menu Privacy settings and check the "Allow my online status to be shown on the Web" as shown in the following screenshot.
Implementation
Step 1
Create a new project named "UsersSkypeStatusInMVC" and choose the template "MVC". It then creates an MVC template project.
Step 2
Add a Controller named "AdminController" with the following procedure.
- Right-click on the "Controllers" folder and select the "Add" option and click on the "Controller" link.
- It opens a pop-up and then select the option "MVC 5 Controller – Empty" and then click on the "Add" button.
- Again, it opens a popup and then provide the name as "AdminController" and click on the "Add" button.
Now, the controller is created with a default code.
Step 3
In this step, Add a Model named "UserModel" using the following procedure.
Step 3
In this step, Add a Model named "UserModel" using the following procedure.
- Right-click on the "Models" folder and select the "Add" option and click on the "Class...".
- It opens a pop-up and then enter the name as "UserModel.cs" and click on the Add button.
- namespace UsersSkypeStatusInMVC.Models
- {
- /// <summary>
- /// User Model
- /// </summary>
- public class UserModel
- {
- public int UserId { get; set; }
- public string Name { get; set; }
- public string Email { get; set; }
- public string SkypeId { get; set; }
- public string ProfileImagePath { get; set; }
- }
- }
This step, replace the existing code in the "AdminController.cs" file with the following code.
- using System.Collections.Generic;
- using System.Web.Mvc;
- using UsersSkypeStatusInMVC.Models;
- namespace UsersSkypeStatusInMVC.Controllers
- {
- public class AdminController : Controller
- {
- // GET: UsersProfile
- public ActionResult UserProfiles()
- {
- List<UserModel> usersList = GetUsers();
- return View(usersList);
- }
- /// <summary>
- /// Get the list of sample users
- /// </summary>
- /// <returns>User List</returns>
- private List<UserModel> GetUsers()
- {
- var usersList = new List<UserModel>
- {
- new UserModel
- {
- UserId = 1,
- Name="Ramchand",
- Email = "ram@abc.com",
- SkypeId = "ramchand.repalle", // Skype Id
- ProfileImagePath = "Ramchand.jpg"
- },
- new UserModel
- {
- UserId = 2,
- Name="Abc",
- Email = "chand@abc.com",
- SkypeId = "abctest",// Skype Id
- ProfileImagePath = "abc.jpg"
- },
- new UserModel
- {
- UserId = 3,
- Name="def",
- Email = "def@abc.com",
- SkypeId = "ram",// Skype Id
- ProfileImagePath = "def.jpg"
- }
- };
- return usersList;
- }
- }
- }
- The GetUsers() method will provide a sample list of users.
- You will call that method in the UserProfiles Action Result method and then send that list of users to the view.
Step 5
This step, add a view for the UserProfiles Action controller method by the following procedure:
This step, add a view for the UserProfiles Action controller method by the following procedure:
- Right-click on the View() method in the UsersProfile Action method and click on "Add View".
- Enter the view name as "UserProfiles" and then click on the "Add" button.
Step 6This step replaces the existing code in the "UserProfiles.csthtml" file design with the following code.
- @model IEnumerable<UsersSkypeStatusInMVC.Models.UserModel>
- @{
- ViewBag.Title = "User Profiles";
- }
- <h2>User Profiles</h2>
- <style type="text/css">
- .lblHeader {
- font-weight: bold;
- }
- .userProfile {
- box-shadow: 10px 10px 5px #888888;
- width: 300px;
- height: 200px;
- float:left;
- margin-right:30px;
- }
- </style>
- @foreach (var item in Model)
- {
- var skypeId = @Html.DisplayFor(modelItem => item.SkypeId);
- var profileImg = "../../Images/" + @Html.DisplayFor(modelItem =>
- item.ProfileImagePath);
- <div class="userProfile">
- <div style="float: left;min-width: 180px;">
- <label class="lblHeader">UserId:</label>
- @Html.DisplayFor(modelItem => item.UserId) <br />
- <label class="lblHeader">Name:</label>
- @Html.DisplayFor(modelItem => item.Name) <br />
- <label class="lblHeader">Email:</label>
- @Html.DisplayFor(modelItem => item.Email) <br />
- <label class="lblHeader">Skype:</label>
- <a style="text-decoration: none;" href="skype:@skypeId?chat">
- <img class="skypeStatusImg" style="margin-top: 1px"
- src="http://mystatus.skype.com/mediumicon/@skypeId">
- </a>
- <a style="text-decoration: none;" href="skype:@skypeId?call">
- <img src="http://www.skypeassets.com/i/scom/images/skype-
- buttons/callbutton_24px.png">
- </a>
- </div>
- <div>
- <img alt="ProfilePic" height="100" width="100" src="@profileImg" />
- </div>
- </div>
- }
- <div class="clearfix"></div>
- <script type="text/javascript" language="javascript">
- function SkypeUserStatus() {
- $(".skypeStatusImg").each(function () {
- var imgSrc = $(this).attr("src").split("?")[0] + "?";
- $(this).attr("src", imgSrc + new Date().getTime());
- });
- }
- setInterval(SkypeUserStatus, 1000);
- </script>
- Added a namespace to get the list of users.
- CSS styles are defined.
- A foreach loop helps to display the list of users with respective details.
- Skype: {SKYPE ID}?chat: This is the href tag, you can use to chat the Skype by clicking on that. For example: skype:ramchand.repalle?chat
- Skype: {SKYPE ID}?call: This is the href tag, you can use to call the Skype by clicking on that. For example: skype:ramchand.repalle?call
- JavaScript function SkypeUserStatus helps to assign the Skype status image.
- SetInterVal has been used to call the SkypeUserStatus function periodically to get the current Skype status of a user.
Step 7This step helps you about Skype Status URL information and other details. To display the Skype status of any user, you have to request the URL format as follows.
The format of the URL is: http://mystatus.skype.com/{SIZE OF ICON}/{SKYPE ID}
{SIZE OF ICON}: It indicates to display the size of the icon based on user Skype status.
For example: smallicon, mediumicon
{SKYPE ID}: It indicates the Skype Id of the user.
For example: ramchand.repalle
So, the example of the Skype status URL is http://mystatus.skype.com/mediumicon/ramchand.repalle.
You can get the status of the user by just clicking on the previously shown URL.
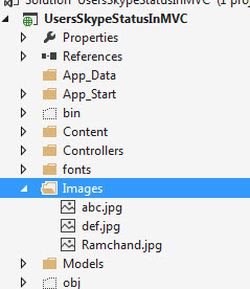
Step 8Add a new folder named “Images” with sample images to the “UsersSkypeStatusInMVC” project. It helps display the sample image for the profile picture as mentioned in the "GetUsers()" method in AdminController.
Step 9
Now, build the application (F6), then run (hit F5) an application and navigate to the following URL:(http://localhost:57882/Admin/UserProfiles).
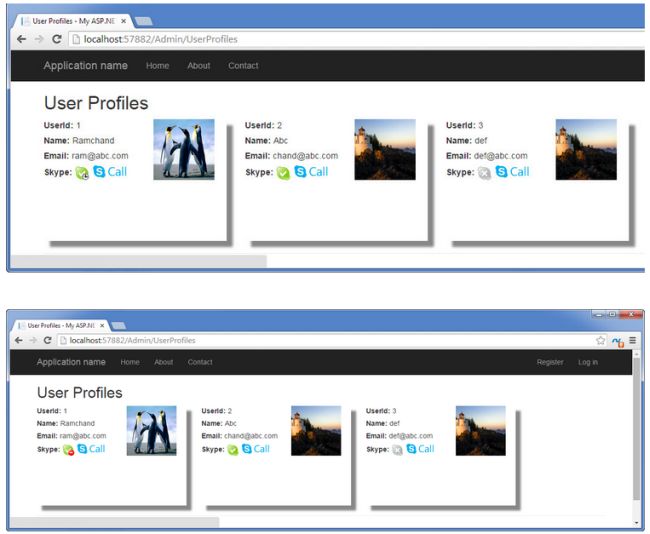
As in the preceding screenshots by clicking on the (Skype) icon it displays a popup to launch the application in Skype. You just click on that then it would open a Skype user window.
The Skype status images are displayed as described below.

The discussed project source code can be downloaded from the link Source Code.
Conclusion
I hope this article helps you to display the Skype user status with the user profile details in a MVC application.
The format of the URL is: http://mystatus.skype.com/{SIZE OF ICON}/{SKYPE ID}
{SIZE OF ICON}: It indicates to display the size of the icon based on user Skype status.
For example: smallicon, mediumicon
{SKYPE ID}: It indicates the Skype Id of the user.
For example: ramchand.repalle
So, the example of the Skype status URL is http://mystatus.skype.com/mediumicon/ramchand.repalle.
You can get the status of the user by just clicking on the previously shown URL.
Step 8Add a new folder named “Images” with sample images to the “UsersSkypeStatusInMVC” project. It helps display the sample image for the profile picture as mentioned in the "GetUsers()" method in AdminController.
Step 9
Now, build the application (F6), then run (hit F5) an application and navigate to the following URL:(http://localhost:57882/Admin/UserProfiles).
As in the preceding screenshots by clicking on the (Skype) icon it displays a popup to launch the application in Skype. You just click on that then it would open a Skype user window.
The Skype status images are displayed as described below.
The discussed project source code can be downloaded from the link Source Code.
Conclusion
I hope this article helps you to display the Skype user status with the user profile details in a MVC application.
Subscribe to:
Posts
(
Atom
)