Overview In this article we will learn how to post data to a MVC action using KnockoutJS.
DemoIn this demo application we will create a simple form for capturing product information like product code, product name and price and submit this information to a MVC action.
Let's start by creating a demo application. I am using Visual Studio 2012 Ultimate edition for this demo.
Procedure1. Create a new MVC 4 web application project and select the Basic template.
2. Add a controller “HomeController” and “Index” view.
3. Now we will add the required scripts. Make the following changes in App_Start -> BundleConfig.cs and Views->Shared->_layout.chtml.
BundleConfig.cs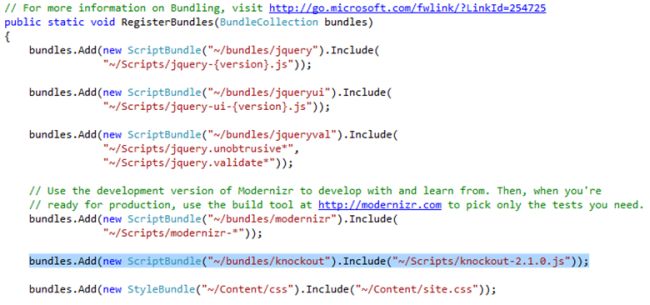 _Layout.chtml
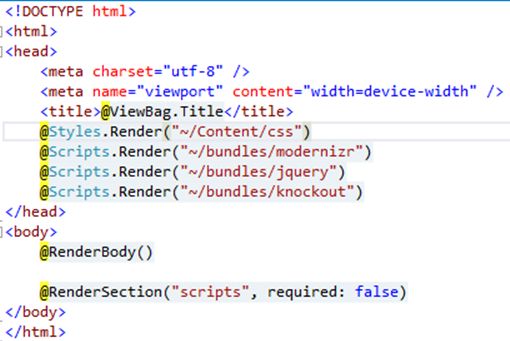
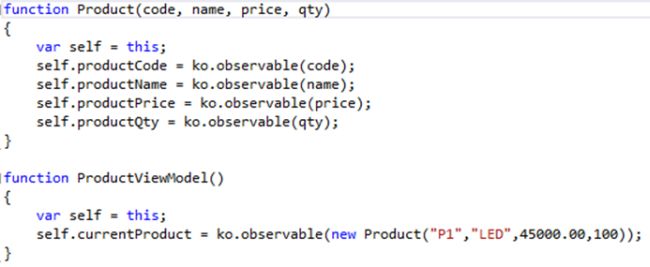
4. Now we will create a Product model and ProductViewModel. Create an App folder under the Scripts folder and add a product.js file and add the following code to it. Now we have a ProductViewModel with currentProduct property initialized with some test data.
Now we will bind the ProductViewModel with the view which is Index.chtml. We have made all the properties of the Product model and ProductViewModel observable so that whenever there is a change in the View it will automatically update the ViewModel. This is the beauty of the Knockout framework and that is why we call it a binding library.
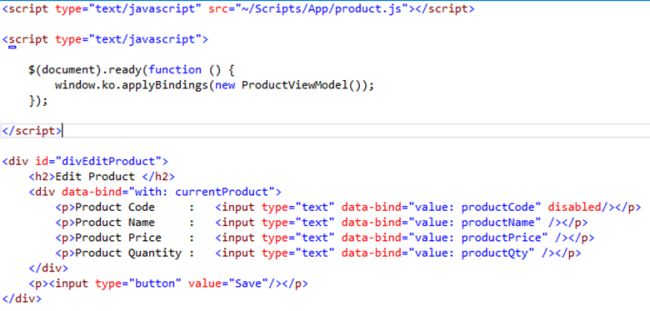
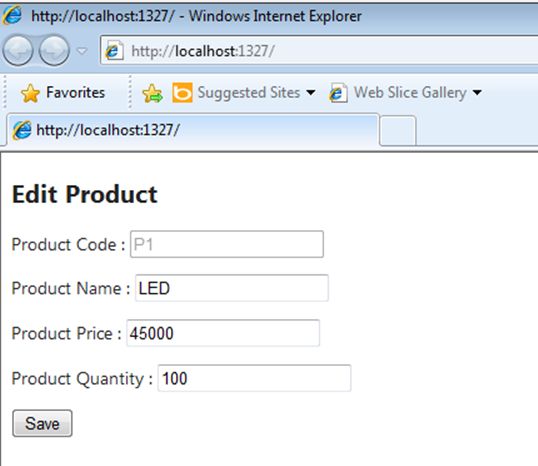
5. Let's add the following markup into our Index.html.
In the view we need to first add the reference of the product.js., Next we need to bind our viewmodel with the view using the applyBindings method., Next we are using with: binding to bind the currentProduct view model property to the product section (<div>) and also bind the child controls with the currentProduct sub properties. So whenever there is a change in the control value it will be reflected in the currentProduct object.
6. Now at this point we are ready to run the application and we should see the index view auto-populated with the product information. Now press F5.
7. Now there are the following two ways to POST the data to a MVC action:
- Using $.ajax (ajax call to post the data): In this case the MVC action should return the JsonResult and control will return to the callback function either in SUCCESS or ERROR. But we can't use this approach if we want to redirect our control to some other action.
- Another way is to use a Knockout builtin function (ko.postJSON). Here you can redirect to some other page after saving.
We will look at option (b) below.
8. Now the next task is to POST the changes to the MVC action on the click of the Save button. Let's create a method “saveProduct” in our view model and bind it with the onclick event of the Save button. Let's add the following code to product.js and index.chtml.
Product.js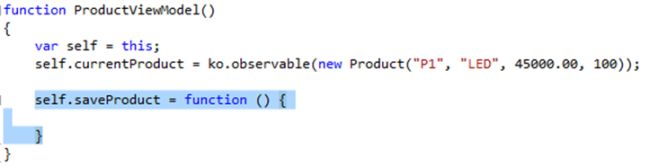 Index.chtml
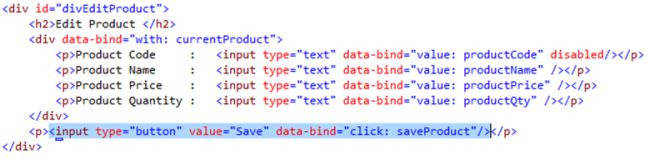
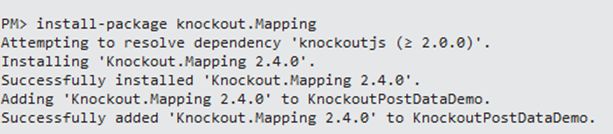
9. Now the next thing we need to do is to convert our view model object into a JSON object so that we can post it to a MVC action. To do this we will use the Knockout mapping plugin “knockout.Mapping 2.4.0” which is available as Nuget.
Go to "TOOLS" -> "Library Package Manager" -> "Package Manager Console".
Install the Nuget as shown below. It will add “knockout.mapping-latest.js” into the Script folder.
Add the “knockout.mapping-latest.js” into the existing knockout script bundle.

Now we are ready to use the knockout mapping plugin in our demo.
10. Now create the class ProductModel under the Model folder which should contain the same properties as the Product class in product.js. It will look as in the following:

Now create an Action called “SaveProduct” which should be called when we click on the “Save” button and we will use “ProductModel” as an input parameter.

Now go to the product.js and first convert the knockout model into JS then post it to the MVC action “SaveProduct”. Product.js will look like as below. We will use the ko.utils.postJson function to post the JSON form of our product model to the MVC action.

Now if we run the application and hit “Save”, we should receive the data in the product model as a parameter in the “SaveProduct” action but we did not, we received NULL instead.

The reason is MVC default model binding is unable to de-serialize the Knockout model (in JSON format) into a ProductModel. So we will need to create a custom model binding attribute to de-serialize the knockout model into MVC ProductModel.
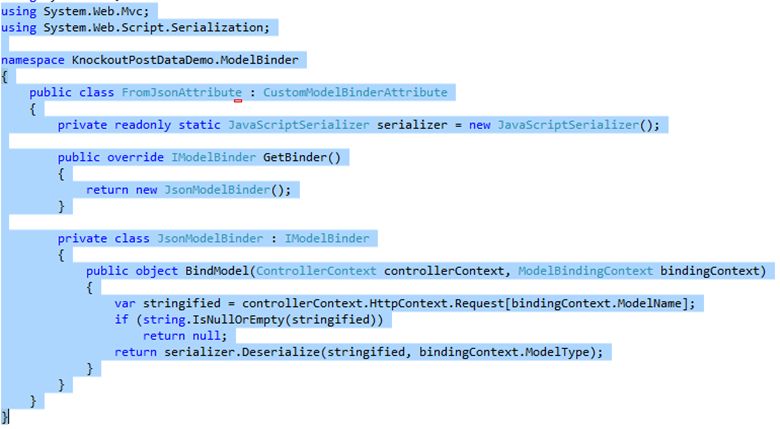
In the code above we have used the JavaScriptSerializer to de-serialize the JSON data which is taken from the request object.
Now apply the attribute on SaveProduct action's input parameter and run the application again.

Now we are receiving the update model in our MVC action.