IntroductionPre-RequisitesThis
article is meant for my fellow developers with knowledge of ASP.NET MVC
and are wondering what architecture to choose. I am trying to write
this article to be as simple and easy to understand and implement.
Let's StartThe
Onion Architecture was introduced by Jeffery Palermo in 2008 with the
intent to make applications loosely coupled and with proper separation
among the folders and the various areas of concern in the application.
This makes the development easier, the testing of the application
easier and the maintenance becomes easier. During the initial stage of
development, the Software Requirement Specifications (SRS) is made and
proper planning is done regarding what should be the approach, what
technologies are to be used and then is done. The most difficult part is
choosing the proper architecture so that the maintenance becomes
easier. Here, the points that are kept in mind are:
- All code depends on layers closer to the center.
- Domain Models will be at the Center or the Core.
- The inner layer defines the interfaces whereas the outer layer implements these interfaces members.
- There is a layered behavior around the domain.
- The
infrastructure for containing the data and the service implementation
should be pushed to the edge. Along with the infrastructure, the UI
concerns are also pushed to the edge.
Background
There
are many architectures used in web applications, but the question is
how to choose the architecture that would help attain loose coupling
that is most essential. Loose Coupling depends on a separation of
concerns. That means that each layer will be independent of each other.
What is tightly coupled and loosely coupled?

Yes,
exactly as you are thinking my dear readers. But still let me discuss
the difference quickly. A tightly coupling is where the one
object/entity needs to have knowledge of other objects or we can say
they depend largely on the interfaces where the service methods are
declared. This can be avoided in small applications, but in large
applications, these terms are required to be kept in mind, else it may
lead to chaos.

A
loose coupling, yes is the opposite, where there is very less
dependency amongst the objects and the interfaces for which there is a
chance of a clean separation of concerns and proper flexibility in the
applications since it makes the framework more stable and enables proper
maintainability. And it makes the developers happy.

The following shows the Onion Architecture at glance:
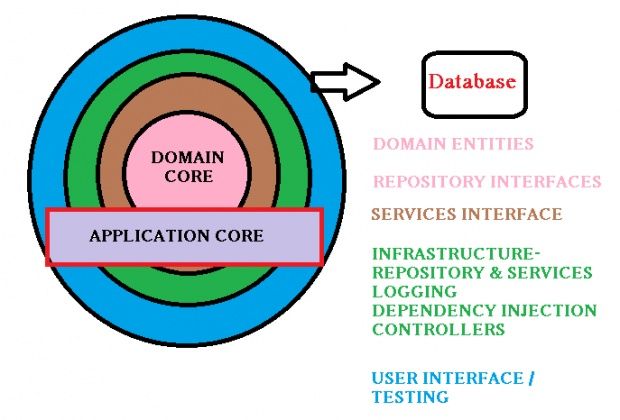
In the preceding image, as we can see, the Core is the Domain model. This layer contains the POCO entities.
Domain objects are:
1.Encapsulates application business logic and rules.
2.Maintains any state that is required.
3.Does not depend on external infrastructure concerns.
In this article and demo I have added the Repository interfaces in the Core.
The
Layers above in Brown has the Service Interfaces. The layer in Green is
the implementation layer, or the Infrastructure Layer, where the
Repositories and the Services methods are implemented. The Error Logging
(especially NLog) is used. Also the Dependency Injection is implemented
here to inject the dependencies into the controllers.
The layer in Blue (the outer layer) has the testing and the User Interfaces.
Thus, this was a simple description of the architecture, but the following diagram explains it better:
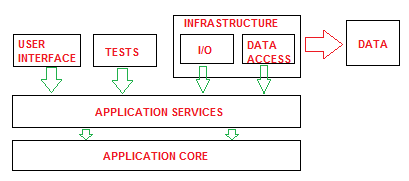
Here
we can see there is no transitive dependency among the Test, UI and the
Data Access that seems better for the Unit testing in MVC applications.
This is the Layered Onion Architecture that proves to make an
application loosely coupled.
The application service
implementation as we can see is in a separate layer and the dependency
finally is on the Core Domain. The Green arrows in the diagram
represents the dependencies. Now let's look at a sample code. The demo
is provided in the article for download.
Using the codeIn this demo we will see how simple the folder structure of the solution is. Let's see the structure:
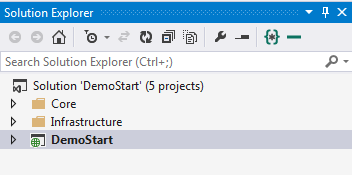
This
is how simple the solution of the project would look like if we use the
Onion Architecture. Now let's look at an expanded project:
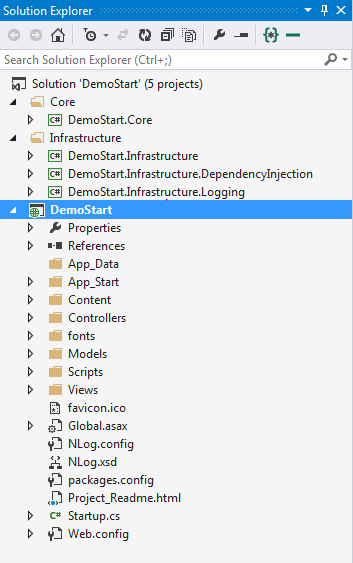
Let's discuss each of the folders one by one.
The Core
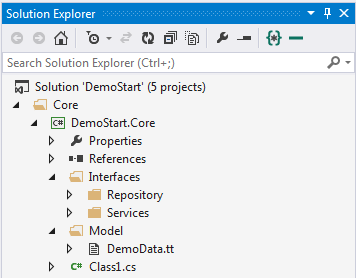
This
is how the core looks like. The core folder contains a class library
project, that has interfaces both for Repositories and Services and the
Model with the a .tt (T4 template) file that is autogenerated containing
the POCO entities since I have used the Database First approach here.
An important thing to note here is the .edmx file that is generated by
the use of the Database First approach that contains the .tt file. To
move that to the Core folder from the .edmx, cut the .tt file and paste
that into the folder you want to, here Core -> Models. Only doing
this does not end the topic, we need to specify the physical path of
that file as shown in the diagram below:

As
you can see in the image, there is a folder called Interface. As the
name suggests, this contains the Repositories and Service Interfaces.
Infrastructure

This
folder contains more than one project and contains the integral part of
an application. The first project in this solution is a class library
project with the first folder Data containing the .edmx file. An .edmx
file, as defined in the MSDN, is a conceptual model and a storage model
and the relationships among them. This also contains the Context classes
and the .tt file, but regarding the .tt file we have already discussed
the core since we have moved this file to the core project. The first
project also contains the Repository and Service implementations as
specified in the interface.
The main and the best part is the
second project in the infrastructure, in other words the Dependency
Injection, is an integral part when we want the Separation of
concerns/Loose coupling in an application. In the preceding figure, we
have two classes, one for each of the Repository Module and the Service
Module. In the demo project, I have used Ninject. On adding Ninject for
MVC from the Nuget Package, it adds NinjectWebCommon.cs to the App_Start
folder that looks as in the following snippet:
- using System.Collections.Generic;
- using DemoStart.Core.Interfaces;
- using DemoStart.Infrastructure.DependencyInjection;
- using DemoStart.Infrastructure.Logging;
- using DemoStart.Infrastructure.Services;
- using Ninject.Modules;
- [assembly: WebActivatorEx.PreApplicationStartMethod(typeof(DemoStart.App_Start.NinjectWebCommon), "Start")]
- [assembly: WebActivatorEx.ApplicationShutdownMethodAttribute(typeof(DemoStart.App_Start.NinjectWebCommon), "Stop")]
-
- namespace DemoStart.App_Start
- {
- using System;
- using System.Web;
-
- using Microsoft.Web.Infrastructure.DynamicModuleHelper;
-
- using Ninject;
- using Ninject.Web.Common;
-
- public static class NinjectWebCommon
- {
- private static readonly Bootstrapper bootstrapper = new Bootstrapper();
-
-
- <summary>
-
- public static void Start()
- {
- DynamicModuleUtility.RegisterModule(typeof(OnePerRequestHttpModule));
- DynamicModuleUtility.RegisterModule(typeof(NinjectHttpModule));
- bootstrapper.Initialize(CreateKernel);
- }
-
- <summary>
-
- public static void Stop()
- {
- bootstrapper.ShutDown();
- }
-
- <summary>
-
-
-
- private static IKernel CreateKernel()
- {
- var kernel = new StandardKernel();
- try
- {
- kernel.Bind<func<ikernel>>().ToMethod(ctx => () => new Bootstrapper().Kernel);
- kernel.Bind<ihttpmodule>().To<httpapplicationinitializationhttpmodule>();
- RegisterServices(kernel);
- return kernel;
- }
- catch
- {
- kernel.Dispose();
- throw;
- }
- }
-
- <summary>
-
-
-
- private static void RegisterServices(IKernel kernel)
- {
- var modules = new List<ininjectmodule>
- {
- new RepositoryModule(), new ServiceModule()
- };
-
- kernel.Load(modules);
- kernel.Bind<iloggingservice>().To<loggingservice>();
- }
- }
- }
Once
we have added the Ninject for the MVC to our project, the next big
thing to do is to bind the interfaces of the repositories and services
to the Implementations such as in the following snippets.
For RepositoryModule.cs
- public class RepositoryModule :NinjectModule
- {
- public override void Load()
- {
-
- Bind<idemointerfacerepository>().To<demointerfaceimplementationrepository>();
- }
- }
For ServiceModule.cs
- public class ServiceModule : NinjectModule
- {
- public override void Load()
- {
-
- Bind<idemointerfaceservice>().To<demointerfaceimplementationservice>();
-
- }
- }
Now,
you will be wondering why we the Repository and Service. The Service
methods are the Bridge/Flyover between the Controller/Business Logic and
the Repository implementation, for making it more loosely coupled since
there will be another layer between the Business logic and the Data
access layer.
The next project is the Logging project that is the
error logging that helps in logging the errors/exceptions to the
database. Here in this demo project, I have used NLog.
DependenciesIn this architecture, the
Web project has its dependencies on the other two projects, in other words the
Core and the Infrastructure.
The
Infrastructure project depends on the Core and the Core is independent
of every other. As in the diagram for the Onion Architecture we have
proven that the Core remains in the Core/Center and there is no
transitive dependency amongst the UI and the Test with the data Access
Layer. Check the images below:
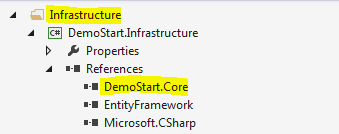
You can check the dependencies among the projects and the Core that is independent.
Points of InterestFinally, straight from the words of Jeffery Palermo, the father of this concept:
1.The application is built around an independent object model.
2.The layers inside define the interfaces (the core) and the outer layers implement them.
3.The coupling direction is towards the center, as in an
Onion, as the name suggests.
Thus,
the Onion Architecture helps decouple the Infrastructure and the
Business (Controller) and the User Interface (Views) without getting
into the OOP concept or has no new concepts with regards to the
domain-driven approach.
This is thus a very simple and general, but very effective architecture. I hope readers will love this.
References
Jeffery Palmero.
Peel Onion Archi.